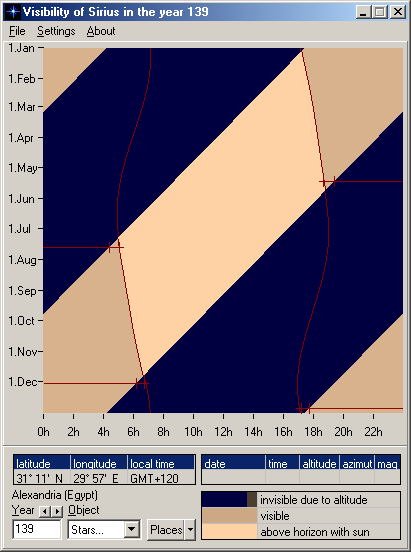
Computation of Visibility Phenomena
Brief Description of Method
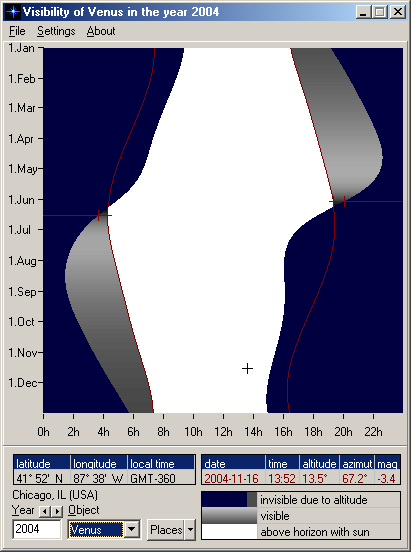
The method of computing the visibility diagrams is simple enough although computationally intense. For each day of the year for the specified location the time the object: (1) rises, (2) if a planet or star, is at a critical altitude for visibility, and (3) sets, and the time the sun (4) rises and (5) sets, all corrected for refraction, are computed. This allows the distinctions in the visibility diagram of when the object is (1) below the horizon (black) and invisible, (2) if a planet or star, above the horizon but invisible due to low altitude (dark color), below the critical altitude, (3) above the horizon with the sun (light color) and invisible, although the moon is usually and Venus sometimes visible with the sun, (4) if a planet or star, above the horizon and the critical altitude with the sun sufficiently far below the horizon (shaded color), by at least the arcus visionis, and so possibly visible. For a planet the shading also shows variation of magnitude, from light when the planet is brighter to dark when fainter (if the computers color resolution is 15 bpp. or better, meaning high color or true color). The source code of the underlying ephemeris for the sun, moon, and planets is that of Steve Moshier (see www.moshier.net for more information) with further corrections from Alcyone Ephemeris (see www.alcyone-ephemeris.info for more information and to download). The positions of stars are computed by applying precession and proper motion to equatorial coordinates in the Yale Bright Star Catalogue for J2000. To calculate positions for the visibility diagrams, the program uses time-dependent mean orbital elements of the planets given by Jan Meeus and a simplified (fast but less accurate) algorithm for the moon if the year is between AD 1900 and 2100. All other calculations of planetary and lunar positions, in particular for the heliacal phenomena and the eclipse diagrams, are based upon the Moshier ephemeris and Alcyone Ephemeris. The criteria for determining whether the object is actually visible, the purpose of the dates of visibility phenomena, is explained below. We shall consider in order the sun, moon, superior planets (Mars, Jupiter, Saturn), inferior planets (Mercury, Venus), and stars.Sun
The computation for the sun is straightforward. The time of rising and setting, corrected for refraction, is computed for each day for the selected location. The diagram shows when the sun is above the horizon (light color), below the horizon (black), and twilight (shaded color), which fades toward the beginning or end of astronomical twilight, when the vertical distance of the sun below the horizon is 18°.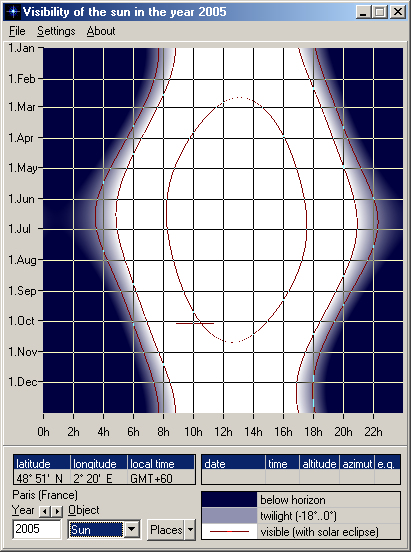 If mark
sunrise/sunset is checked in the Settings menu, curved lines
showing the times of sunrise and sunset are drawn. Moving the cursor over the
diagram shows, below the diagram, the date, time in intervals of 4 minutes,
and the altitude and azimuth to 0.1 degree. Hold down the left mouse button,
and lines for the date and time appear; moving the cursor then shows, below
the diagram, the same information for (1) change of time with fixed date, (2)
change of date with fixed time, (3) change of both time and date. If mark
eclipses is checked in the Settings menu, a short horizontal line
in the diagram, if present, shows the date and time of a solar eclipse
visible from the selected location; moving the cursor over the line shows,
below the diagram, the eclipse quantity (e.q.), the percent of the
sun eclipsed, and opens the solar eclipse window showing the progress
of the eclipse, which is described in detail below.
If mark
sunrise/sunset is checked in the Settings menu, curved lines
showing the times of sunrise and sunset are drawn. Moving the cursor over the
diagram shows, below the diagram, the date, time in intervals of 4 minutes,
and the altitude and azimuth to 0.1 degree. Hold down the left mouse button,
and lines for the date and time appear; moving the cursor then shows, below
the diagram, the same information for (1) change of time with fixed date, (2)
change of date with fixed time, (3) change of both time and date. If mark
eclipses is checked in the Settings menu, a short horizontal line
in the diagram, if present, shows the date and time of a solar eclipse
visible from the selected location; moving the cursor over the line shows,
below the diagram, the eclipse quantity (e.q.), the percent of the
sun eclipsed, and opens the solar eclipse window showing the progress
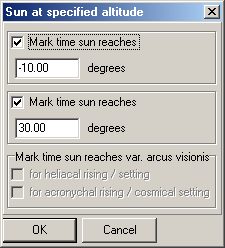
of the eclipse, which is described in detail below.To draw curves in the visibility diagram showing the times the sun is at specified altitudes, in the Settings menu select Sun at specified altitude... or press Ctrl-A. In the dialog Sun at specified altitude, check Mark time sun reaches and type in one or two altitudes in degrees (to 0.01, limit ±90).
 The visibility diagram above shows curves for sunrise and sunset and for these two specified altitudes at Paris; the grid is drawn showing the beginning of each month and the time at intervals of two hours. These curves can be used, for example, to find when the sun reaches the end of civil, nautical, and astronomical twilight at altitudes of -6°, -12°, and -18°. Where a curve for a specified altitude is discontinuous, passing outside the diagram for negative altitudes or broken within the diagram for positive altitudes, the sun does not reach the specified altitude. This can be useful for finding if and when during the year at higher geographical latitudes the sun reaches negative altitudes below the horizon required for visibility of planets and stars, and can also be used to find if and when the sun reaches specified positive altitudes above the horizon. At very high latitudes, the curves for sunrise and sunset can also be discontinuous for dates that the sun does not rise or set.
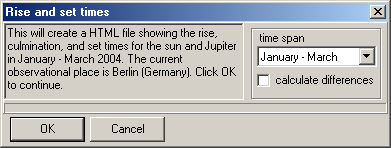
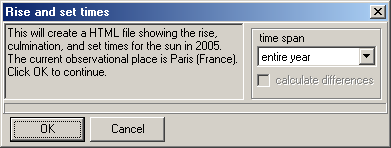 To compute an HTML file of the rise, culmination, and set times of the sun, and the differences in time set - rise, in the File menu select Rise and set times (HTML)..., and in the Rise and set times dialog select the time span of the entire year, quarter year, or single month. Click OK and an HTML file of rise, culmination, and set times is computed which opens in the default browser. The file may then be saved and opened in other applications, as word processors or spread sheets, and may be linked to web pages. The time of culmination is the time the sun reaches its greatest altitude corrected for refraction. At very high latitudes, on dates the sun does not rise or set, no rise or set times and set - rise differences are given, and where culmination is below the horizon the time is in parentheses (...).
Moon
The moon requires the longest computation of any of the bodies because of the many inequalities in its motion, so be patient if your processor is slow. For each day, the time of sunrise and sunset, moonrise and moonset, are calculated for the selected location, corrected for refraction and lunar parallax, and the diagram shows when the moon is below the horizon (black), above the horizon with the sun (light color), above the horizon without the sun (shaded color).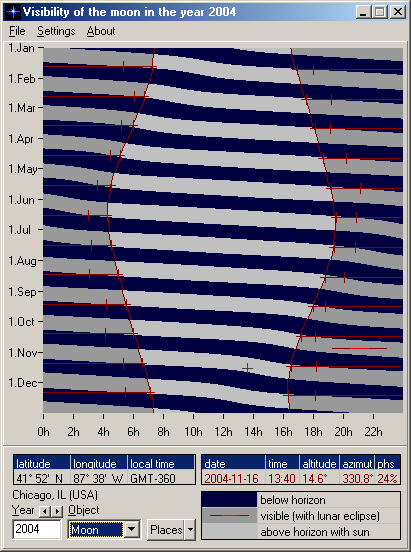 If mark
sunrise/sunset is checked in the Settings menu, curved lines
showing the times of sunrise and sunset are drawn. Moving the cursor over the
diagram shows, below the diagram, the date, time in intervals of 4 minutes, altitude
and azimuth to 0.1 degree, and phase in percent illumination. Hold down the
left mouse button, and lines for the date and time appear; moving the cursor
then shows, below the diagram, the same information for (1) change of time
with fixed date, (2) change of date with fixed time, (3) change of both time
and date. The moon is usually visible when above the horizon, including when
above the horizon with the sun, except for the period of invisibility around
conjunction. It is the purpose of the horizontal lines (check mark dates
of visibility phenomena) to show the dates of last visibility, preceding
conjunction in the morning before sunrise, and first visibility, following
conjunction in the evening after sunset. The small vertical lines show the
times of sun rise/set and moon rise/set on these dates.
If mark eclipses is checked in the Settings menu, a short
horizontal line in the diagram, if present, shows the date and time of a
lunar eclipse visible from the selected location; moving the cursor over the
line opens the lunar eclipse window showing the progress of the
eclipse, which is described in detail below.
If mark
sunrise/sunset is checked in the Settings menu, curved lines
showing the times of sunrise and sunset are drawn. Moving the cursor over the
diagram shows, below the diagram, the date, time in intervals of 4 minutes, altitude
and azimuth to 0.1 degree, and phase in percent illumination. Hold down the
left mouse button, and lines for the date and time appear; moving the cursor
then shows, below the diagram, the same information for (1) change of time
with fixed date, (2) change of date with fixed time, (3) change of both time
and date. The moon is usually visible when above the horizon, including when
above the horizon with the sun, except for the period of invisibility around
conjunction. It is the purpose of the horizontal lines (check mark dates
of visibility phenomena) to show the dates of last visibility, preceding
conjunction in the morning before sunrise, and first visibility, following
conjunction in the evening after sunset. The small vertical lines show the
times of sun rise/set and moon rise/set on these dates.
If mark eclipses is checked in the Settings menu, a short
horizontal line in the diagram, if present, shows the date and time of a
lunar eclipse visible from the selected location; moving the cursor over the
line opens the lunar eclipse window showing the progress of the
eclipse, which is described in detail below.Lunar visibility is one of the oldest problems in astronomy to be treated computationally, by the Babylonians, as in true lunar calendars the month begins with the true first visibility of the moon. Schematic lunar calendars, as the Jewish calendar, use cycles for the date of first visibility, and the Islamic calendar uses both cycles and true first visibility. Our concern here is true first and last visibility, which depend upon the true motions of the moon and sun and the geographical location of the observer.
There are several ways of computing lunar visibility. The Babylonians used (1) the interval of time between sun rise/set and moon rise/set; if this is over a certain amount, the moon is considered visible, otherwise not. Other criteria are: (2) the age of the moon, that is, the interval of time before or after conjunction, at sun rise/set, (3) the altitude of the moon and the difference of azimuth of the sun and moon at sun rise/set; if these are over a certain amount, the moon is considered visible, otherwise not. A discussion of various criteria can be found in SAAO (South African Astronomical Observatory) Lunar Crescent Visibility: First Visibility of the Lunar Crescent: A Discussion of Principles by John A. R. Caldwell and C. David Laney and Crescent Visibility Observations, 1859-2000 by C. David Laney. We have used a remarkably simple relation described in their analysis, namely, that the moon is probably visible if at sun rise/set:
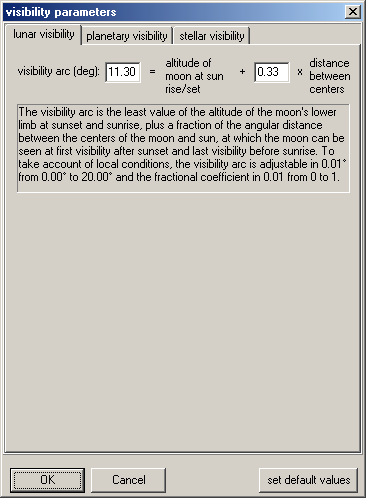
altitude of lower limb of moon + 1/3 distance between centers of moon and sun >= 11.3°,
where 11.3°, which we call the visibility arc, is a lower limit for possible visibility, the probability of which increases with larger values. This appears to work as well as any other methodno method is perfectin distinguishing visible from invisible; a few first visibilities have been seen at lower values and a few not seen at higher values. Note that the moon may not be visible at sun rise/set but at some time in the interval between sun rise/set and moon rise/set. The formula as given contains the default parameters, which can be altered.
 In the Settings
menu select Visibility parameters and then Lunar visibility.
The visibility arc can be set between 0° and 20° in intervals of 0.01°
and the coefficient of the distance between the centers can be set from 0 to
1 in intervals of 0.01. Click OK to confirm changes, which are saved
until replaced or the default values restored; clicking OK
starts a new calculation. It appears that a visibility arc as low as 9° is
possible for observation with optical aid, and values higher than 11.3° may
be taken as more certain for visibility or to take account of local conditions,
as an irregular horizon.
In the Settings
menu select Visibility parameters and then Lunar visibility.
The visibility arc can be set between 0° and 20° in intervals of 0.01°
and the coefficient of the distance between the centers can be set from 0 to
1 in intervals of 0.01. Click OK to confirm changes, which are saved
until replaced or the default values restored; clicking OK
starts a new calculation. It appears that a visibility arc as low as 9° is
possible for observation with optical aid, and values higher than 11.3° may
be taken as more certain for visibility or to take account of local conditions,
as an irregular horizon.In the Settings menu select show dates of visibility phenomena. The window first and last visibility of
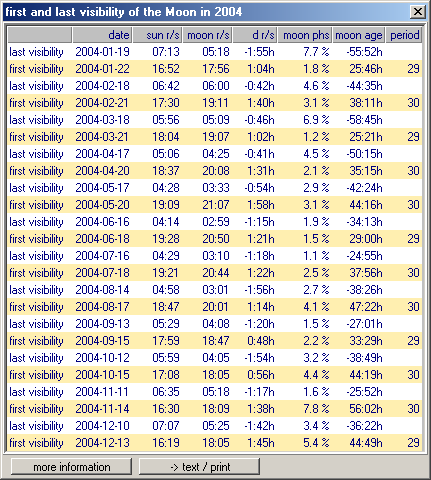 the moon shows the phenomenon, first visibility (F
vis) or last visibility (L vis), the date, the times of sun rise/set and moon
rise/set, the interval of time (d r/s) in the form d r/s = moon rise/set
sun rise/set, hence positive at first visibility and negative at last
visibility, the phase of the moon in percent illumination, the age of the
moon at sun rise/set in hours before () or after (blank) true conjunction,
and the length (period) of the preceding month, the interval between first
visibilities, in integer days, 29 or 30.
the moon shows the phenomenon, first visibility (F
vis) or last visibility (L vis), the date, the times of sun rise/set and moon
rise/set, the interval of time (d r/s) in the form d r/s = moon rise/set
sun rise/set, hence positive at first visibility and negative at last
visibility, the phase of the moon in percent illumination, the age of the
moon at sun rise/set in hours before () or after (blank) true conjunction,
and the length (period) of the preceding month, the interval between first
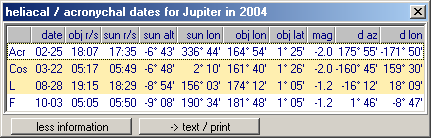
visibilities, in integer days, 29 or 30. At the bottom of the window select more information; the window then gives in addition to the date and times, for the time of sun rise/set: the longitude of the sun, the longitude, latitude, and altitude of the center of the moon,
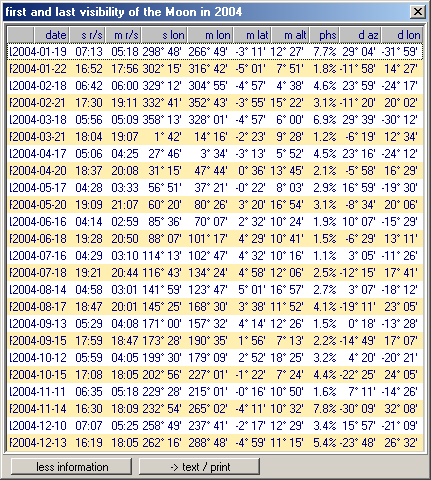 the phase of the moon, and the difference of azimuth and difference of
longitude in the form moon sun. The difference of azimuth is
positive if the moon is at a greater azimuth than the sun; the difference of
longitude is positive at first visibility and negative at last visibility. In
either window, click on text/print; an edit text window opens
containing the information, which can be edited, saved as an .rtf file,
printed, and pasted into other documents. As long as the program is running,
the edit text window accumulates the information in a single file.
the phase of the moon, and the difference of azimuth and difference of
longitude in the form moon sun. The difference of azimuth is
positive if the moon is at a greater azimuth than the sun; the difference of
longitude is positive at first visibility and negative at last visibility. In
either window, click on text/print; an edit text window opens
containing the information, which can be edited, saved as an .rtf file,
printed, and pasted into other documents. As long as the program is running,
the edit text window accumulates the information in a single file.To compute an HTML file of the rise, culmination, and set times of the moon and sun, and the differences in time set - rise, in the File menu select Rise and set times (HTML)..., and in the Rise and set times dialog select the time span of the entire year, quarter year, or single month. To compute the differences in the rise, culmination, and set times of the moon and sun, check calculate differences. Click OK and an HTML file of rise, culmination, and set times is computed which opens in the default browser. The file may then be saved and opened in other applications, as word processors or spread sheets, and may be linked to web pages. The time of culmination is the time the moon reaches its greatest altitude corrected for parallax and refraction. At moderate geographical latitudes, this can differ by about two minutes from the time of meridian transit, but at very high latitudes by as much as ten minutes. In either case the difference in altitude is only a few seconds and is due to the moon's own motion in declination between maximum altitude and meridian transit. Also at very high latitudes, on dates the moon does not rise or set, no rise or set times and set - rise differences are given, also no moon - sun differences for rise and set, and where culmination is below the horizon the time is in parentheses (...).
Note: The difference set - rise for the moon is computed from the time of setting on the specified calendar date minus the time of the previous rising and is always positive; if the time of rising on the specified date is later than the time of setting, the rising is taken on the preceding date. For example, if on day n the moon rises at 16:00 hours and sets at 6:00 hours, and rises at 14:40 hours on day n -1, the computation is set - rise = 6:00 (+ 24:00) - 14:40 = 15:20. The differences of rise, culmination, and set times in the form moon - sun are always computed for the same calendar date, which can result in changes between positive and negative differences when one of the times changes from being greater or less than the other. For example, for rise, moon - sun = 6:00 - 6:20 = -0:20, and on the next day moon - sun = 6:20 - 6:16 = 0:04. About every 28 days, the moon omits a rising, culmination or setting on a single calendar date when crossing 0:00 hours, so no moon - sun difference is computed, and at this time a change of sign also occurs. For example, for set, moon - sun = 23:25 - 17:18 = 6:07, on the next day there is no moon set and thus no moon - sun, and on the following day moon - sun = 0:44 - 17:21 = -16:36.

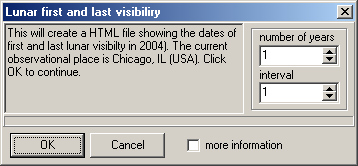
To compute an HTML file of first and last visibility of the moon, in the File menu select Dates of visibility phenomena (HTML)..., and in the Lunar first and last visibility dialog select the number of years (default 1, limit 100) to be computed and the interval in years (default 1, limit 500) between them. To include the information in the more information window, check more information. Click OK and an HTML file of first and last visibility of the moon is computed which opens in the default browser. The file may then be saved and opened in other programs, as word processors or spread sheets, and may be linked to web pages.
Superior Planets: Mars, Jupiter, Saturn
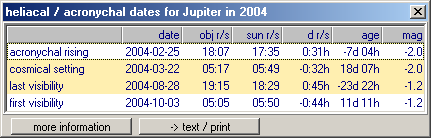
The superior planets have four visibility phenomena:- First visibility or heliacal rising (F): the first visibility of the planet in the east before sunrise following conjunction with the sun.
- Last visibility or heliacal setting (L): the last visibility of the planet in the west after sunset preceding conjunction with the sun.
- Acronychal or evening rising (acron): the last evening the planet is seen to rise in the east following sunset, which usually occurs before opposition to the sun.
- Cosmical or morning setting (cos): the first morning the planet is seen to set in the west before sunrise, which usually occurs after opposition to the sun.
The first three phenomena were observed by the Babylonians, who developed methods of computing them; the fourth was recognized in antiquity but appears to have been of little importance. Interestingly, the method still used to compute these phenomena was already explained by Ptolemy for heliacal rising and setting in the Almagest (ca. AD 150), and we use a more elaborate version of Ptolemys method. The method used here depends upon what is called the arcus visionis, the vertical distance of the sun below the horizon at which a planet can be seen close to the horizon. The arcus visionis is an empirical parameter, different for each planet, that depends upon the magnitude of the planet and its difference of azimuth from the sun, both of which are variable. Our program allows two computations, one using a fixed arcus visionis, the other an arcus visionis that varies with the magnitude of the planet. A second visibility parameter is the critical altitude, the least altitude at which the planet can be seen.
In the Settings menu select visibility parameters , select the planetary visibility page, which shows settings for the arcus visionis and critical altitude, and in the object list select the planet.
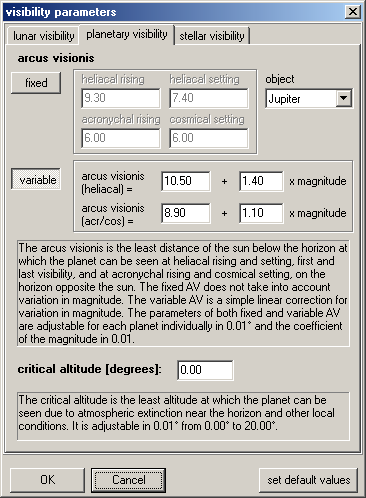
Arcus visionis: Selecting fixed activates the fixed arcus visionis; the default values for heliacal rising and setting are those of Karl Schoch (1928). The values for acronychal rising and cosmical setting, which are our own, are lower since the planet is close to opposition and thus brightest, and these phenomena take place near the darker horizon opposite the sun. The fixed values may be altered in intervals of 0.01°; click OK to confirm changes, which will be saved until replaced or the default values restored, and a new calculation starts. Selecting variable activates the variable arcus visionis to take account of variation in magnitude, computed from two simple, linear formulas, AV = constant + coefficient x magnitude, which differ for phenomena near to and opposite the sun. We have derived the default values, the same for all three planets, by computing a large number of phenomena for each planet and considering the range of magnitudes. For each planet taken separately, the constant may be altered in intervals of 0.01° and the coefficient in intervals of 0.01; click OK to confirm changes, which will be saved until replaced or the default values restored, and a new calculation starts. We shall consider the empirical foundations and uncertainties of both the fixed and variable arcus visionis below in Sources of Computation and Cautions concerning Accuracy .
Critical altitude: The critical altitude is the least altitude at which the planet can be seen due to atmospheric extinction and irregularities in the horizon. It has a very strong effect on the dates of visibilities and may be set separately for each planet from 0° to 20° in intervals of 0.01°. Click OK to confirm changes, which will be saved until replaced or the default value 0° restored, and a new calculation starts. It is unlikely that the planet can be seen crossing the horizon, at 0°, but just what value to use is far from certain and must take into account the brightness of the planet and local conditions. When these parameters, the arcus visionis and the critical altitude have been set or changed, clicking OK both saves the settings and starts a new calculation. Clicking default values restores all the default parameters for the moon and planets. In the Settings menu, check show dates of visibility phenomena.
 |
 |
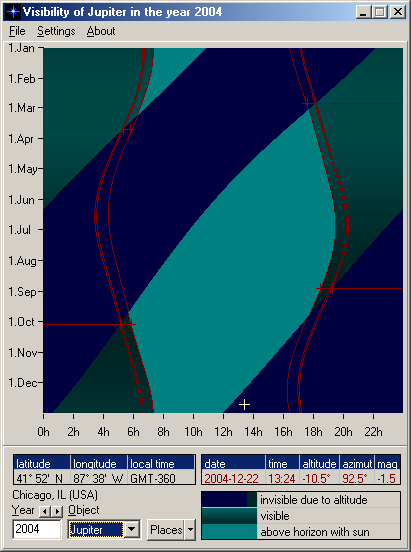
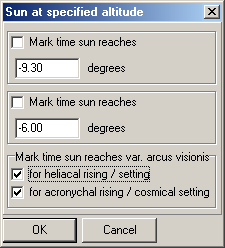 To draw curves in the visibility diagram showing times the sun is at specified altitudes, in the Settings menu select Sun at specified altitude... or press Ctrl-A. In the dialog Sun at specified altitude, check Mark time sun reaches and type in one or two altitudes in degrees (to 0.01, limit ±90). These may be used for the fixed arcus visionis or for any altitudes below or above the horizon. Alternatively, or in addition, under Mark time sun reaches variable arcus visionis check boxes for heliacal rising/setting and/or for acronychal rising/cosmical setting, which draw curves showing when the sun reaches the arcus visionis that varies with the magnitude of the planet. These curves for heliacal and acronychal phenomena are drawn in the diagram for Jupiter shown above. Where a curve for a specified or variable altitude is discontinuous, passing outside the diagram for negative altitudes or broken within the diagram for positive altitudes, the sun does not reach that altitude, which can show the reason for missing phenomena, particularly at higher latitudes where the sun may not reach the arcus visionis with the planet above the critical altitude and for parts of the year may not reach the arcus visionis at all.
To compute an HTML file of the rise, culmination, and set time of the planet and sun, in the File menu select Rise and set times (HTML)..., and in the Rise and set times dialog select the time span of the entire year, quarter year, or single month. To compute the differences in the rise, culmination, and set times of the planet and sun (in the form planet - sun), check calculate differences. Click OK and an HTML file of rise, culmination, and set times is computed which opens in the default browser. The file may then be saved and opened in other applications, as word processors or spread sheets, and may be linked to web pages. At very high latitudes, on dates the planet does not rise or set, no rise or set times and set - rise differences are given, also no planet - sun differences for rise and set, and where culmination is below the horizon the time is in parentheses (...).
Note: The difference set - rise for the planet is computed from the time of setting on the specified calendar date minus the time of the previous rising and is always positive; if the time of rising on the specified date is later than the time of setting, the rising is taken on the preceding date. For example, if on day n the planet rises at 16:00 hours and sets at 2:00 hours, and rises at 16:04 hours on day n -1, the computation is set - rise = 2:00 (+ 24:00) - 16:04 = 9:56. The differences of rise, culmination, and set times in the form planet - sun are always computed for the same calendar date, which can result in changes between positive and negative differences when one of the times changes from being greater or less than the other. For example, for rise, planet - sun = 6:16 - 6:13 = 0:03, and on the next day planet - sun = 6:12 - 6:15 = -0:03. It is possible for a planet to have two risings, culminations or settings on the same calendar date just above and below 0:00 hours, for example at 0:02 hours and 23:56 hours. Changes of sign occur when the time crosses 0:00 hours. For example, for culmination, planet - sun = 0:01 - 11:56 = -11:55, and on the next day planet - sun = 23:56 - 11:52 = 12:04.
To compute an HTML file of heliacal and acronychal phenomena of the planet, in the File menu select Dates of visibility phenomena (HTML)..., and in the Visibility phenomena dialog select the number of years (default 1, limit 100) to be computed and the interval in years (default 1, limit 500) between them. To include the information in the more information window, check more information, the file also includes additional separate columns for the azimuth of the sun and planet. Click OK and an HTML file of visibility phenomena of the planet is computed which opens in the default browser. The file may then be saved and opened in other programs, as word processors or spread sheets, and may be linked to web pages.

Inferior Planets: Mercury, Venus
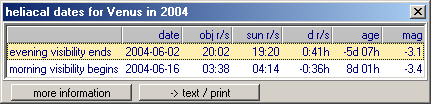
The inferior planets have four visibility phenomena:- First visibility in the evening (EF): the first visibility of the planet in the west after sunset following superior conjunction with the sun.
- Last visibility in the evening (EL): the last visibility of the planet in the west after sunset preceding inferior conjunction with the sun.
- First visibility in the morning (MF): the first visibility of the planet in the east before sunrise following inferior conjunction with the sun.
- Last visibility in the morning (ML): the last visibility of the planet in the east before sunrise preceding superior conjunction with the sun.
All of these were observed in antiquity. The method of computation is the same as for the first and last visibilities of the superior planets, using an arcus visionis that is either fixed or varies with the magnitude of the planet and a critical altitude at which the planet may be visible. In the Settings menu select visibility parameters , select the planetary visibility page, which shows settings for the arcus visionis and critical altitude, and in the object list select the planet. Selecting fixed activates the fixed arcus visionis; the default values for all phenomena are those of Karl Schoch (1928), which may be altered in intervals of 0.01° and will be saved until replaced or the default values restored. Selecting variable activates the variable arcus visionis to take account of variation in magnitude, of the form AV = constant + coefficient x magnitude. The default values are the same as for the first and last visibilities of the superior planets. For each planet taken separately, the constant may be altered in intervals of 0.01° and the coefficient in intervals of 0.01; these values will be saved until replaced or the default values restored. The critical altitude, the least altitude at which the planet can be seen, functions in same way as for the superior planets; the selected value applies to each planet separately and is saved until replaced or the default value 0° restored. When these parameters, the arcus visionis and the critical altitude have been set or changed, clicking OK both saves the settings and starts a new calculation. Clicking default values restores all the default parameters for the moon and planets.
 |
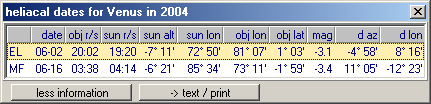 |
The heliacal dates and more information windows and the command text/print are the same as for the superior planets except that the age of ML and EF is the interval of planet r/s from superior conjunction and the age of EL and MF is the interval of planet r/s from inferior conjunction.
The procedure for drawing curves showing times the sun is at specified altitudes or at the arcus visionis is the same as for the superior planets except that the variable arcus visionis is applied only to heliacal phenomena. These curves can be useful for showing the reason for missing phenomena of Mercury when the sun does not reach the arcus visionis with the planet above the critical altitude or above the horizon.
The HTML files for the rise, culmination, and set times of the planet and sun, and for the heliacal phenomena of the planet, are the same as for the superior planets.
Stars
The visibility phenomena of the fixed stars are the same as for the superior planets, heliacal rising and setting, acronychal rising and cosmical setting. However, because stars can be at any latitude from the ecliptic, and can rise and set at any difference in azimuth from the sun, heliacal phenomena are not necessarily at the horizon close to the sun and acronychal phenomena not necessarily at the horizon opposite the sun. Consequently, a clear distinction of the arcus visionis for heliacal and acronychal phenomena may not be applicable, and intermediate values may be preferable. Further, the order of visibility phenomena can change notably from the normal sequence F, acr, cos, L, and, particularly at higher geographical latitudes, stars may have no visibility phenomena at all if they are circumpolar and either always visible or never visible.
 To compute the visibility phenomena of a star, in the object list select stars..., which opens the lists of Stars and runs a calculation for the last selected star. To compute the visibility phenomena of a different star, select it in the list and press Calculate or double-click the name of the star.
The star list gives (1) the common name of the star, (2) the constellation, (3) Bayer letter, (4) Flamsteed number, and (5) magnitude. The list may be ordered by name, by constellation and Bayer letter, or by magnitude by clicking those headings of the list. The window containing the star list remains open until it is closed by the close box so different stars may be selected and calculated directly from the list.
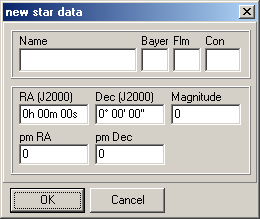
The star list provided with the program contains all stars through magnitude 2.5. To add a new star to the list, click the plus button, which opens the new star data window. Fill in the name of the star, the constellation, Bayer letter, Flamsteed number-if these do not exist a catalog number or other designation may be used for the name-and the following required information:
Click OK and the star appears in the star list.
Note: Proper motions of the faster stars can affect the dates of visibility phenomena by one or two days in antiquity, less for the last few hundred years, with the greater effect at higher geographical latitudes. The Yale Bright Star Catalogue is a convenient source of all required information.
To edit a star in the list, click the triangle button and in the edit star data window follow the procedure for adding a new star. Click OK and the edited data is saved.
To delete a star from the list, click the minus button and in the confirm window click OK to delete record.
 When a new star is added, values of the arcus visionis and critical altitude are assigned to it automatically according to the procedures described next.
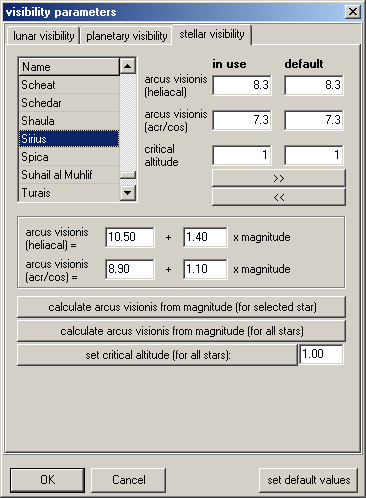
Although the visibility phenomena for stars are the same as for superior planets, the visibility parameters are treated differently. In the Settings menu select visibility parameters , select the stellar visibility page, which shows settings for the arcus visionis and critical altitude, and in the object list select the star. The computation of the arcus visionis uses the formulas for variable arcus visionis of the superior planets; however, the purpose here is not a variation in the magnitude of a single object but that the stars have a large range of magnitudes and fixed values of the arcus visionis for stars are unknown (aside from a few special cases, as Sirius). The default values for the computation are:
heliacal (first and last visibility): arcus visionis = 10.50 + 1.40 x magnitude
acronychal rising, cosmical setting: arcus visionis = 8.90 + 1.10 x magnitude
Both the constant and coefficient of magnitude are adjustable to 0.01 and the resulting arcus visionis is also calculated to 0.01 (although this is surely false precision and 0.1 is a more reasonable limit). Because differences in azimuth between stars and the sun may differ greatly from differences for planets and the sun, particularly at higher geographical latitudes, a clear distinction of arcus visionis for heliacal and acronychal phenomena may be less applicable and it may be advisable to set the arcus visionis manually, taking into account the differences of azimuth. After making any changes, click OK and the new values are saved, but are not yet applied to any stars. If the new values are not to be saved, click Cancel. Whether the values are to be saved or used without saving, the calculation of the arcus visionis is as follows:
To calculate the arcus visionis from the formulas for a single star, select the star in the name list, and press calculate arcus visionis from magnitude (for selected star). The calculated heliacal and acronychal arcus visionis then appear in the in use column and are retained and used in the computation of visibility phenomena. To make these the default values for the selected star, press >>, and the in use values appear in the default column. To make the default values, if different, the in use values, press <<, and the default values appear in the in use column. The in use and default values may also be set manually without using the formulas or arrows. These changes are retained and used in computation whether OK or Cancel is pressed to close the window. Click OK and a calculation is run for the last object calculated, which may not be the star selected and set in the stellar visibility page. To calculate visibility phenomena for the star just set, it must be selected and run from the list of Stars.
To calculate the arcus visionis from the formulas for all stars, for example, if the formulas are changed, press calculate arcus visionis from magnitude (for all stars). The calculated heliacal and acronychal arcus visionis then appear in the in use column for all stars and will be retained and used in the computation of visibility phenomena. To make these the default values, it is necessary to make the changes individually using >> or manually; the reason is that in this way default values for individual stars may be retained while the in use values are varied. These changes are retained and used in computation whether OK or Cancel is pressed to close the window. Click OK and a calculation is run for the last object calculated, which may not be a star.
The critical altitude is adjustable from 0° to 20° at intervals of 0.01° (although here also 0.1° is more reasonable precision). The default value is 0°, crossing the horizon, but it is not likely that any star is visible at the horizon so some higher value, depending upon the magnitude of the star and local conditions, should be used. To set the critical altitude for a single star, select the star in the name list and enter the critical altitude in the in use column; this value is retained and used in the computation of visibility phenomena. The values may be shifted between the in use and default columns by pressing >> and << and may also be set manually. To set the same critical altitude for all stars, enter it next to set critical altitude (for all stars) and press that button; the value then appears in the in use column for all stars. As for the arcus visionis, the default values must be set individually using >> or manually; in this way the in use values may be varied and default values for individual stars retained. The critical altitude, for a single star or for all stars, is retained and used in computation whether OK or Cancel is pressed to close the window. Click OK and the value assigned to set critical altitude (for all stars) is saved and a calculation is run for the last object calculated, which may not be a star.
Finally, the set default values button performs the following functions:
When a new star is added to the list of Stars, the in use and default values of the arcus visionis and critical altitude are automatically set using the formulas for arcus visionis and the critical altitude for all stars last saved in the stellar visibility page.
The heliacal/acronychal dates and more information windows and the command text/print are the same as for the superior planets.
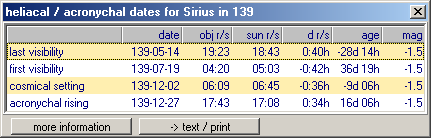

The HTML files for rise, culmination, and set times of a star and the sun, and for the heliacal and acronychal phenomena of a star, are the same as for the superior planets.
To compute the visibility phenomena of a star, in the object list select stars..., which opens the lists of Stars and runs a calculation for the last selected star. To compute the visibility phenomena of a different star, select it in the list and press Calculate or double-click the name of the star.The star list gives (1) the common name of the star, (2) the constellation, (3) Bayer letter, (4) Flamsteed number, and (5) magnitude. The list may be ordered by name, by constellation and Bayer letter, or by magnitude by clicking those headings of the list. The window containing the star list remains open until it is closed by the close box so different stars may be selected and calculated directly from the list.
The star list provided with the program contains all stars through magnitude 2.5. To add a new star to the list, click the plus button, which opens the new star data window. Fill in the name of the star, the constellation, Bayer letter, Flamsteed number-if these do not exist a catalog number or other designation may be used for the name-and the following required information:
 |
|
Note: Proper motions of the faster stars can affect the dates of visibility phenomena by one or two days in antiquity, less for the last few hundred years, with the greater effect at higher geographical latitudes. The Yale Bright Star Catalogue is a convenient source of all required information.
To edit a star in the list, click the triangle button and in the edit star data window follow the procedure for adding a new star. Click OK and the edited data is saved.
To delete a star from the list, click the minus button and in the confirm window click OK to delete record.
When a new star is added, values of the arcus visionis and critical altitude are assigned to it automatically according to the procedures described next.Although the visibility phenomena for stars are the same as for superior planets, the visibility parameters are treated differently. In the Settings menu select visibility parameters , select the stellar visibility page, which shows settings for the arcus visionis and critical altitude, and in the object list select the star. The computation of the arcus visionis uses the formulas for variable arcus visionis of the superior planets; however, the purpose here is not a variation in the magnitude of a single object but that the stars have a large range of magnitudes and fixed values of the arcus visionis for stars are unknown (aside from a few special cases, as Sirius). The default values for the computation are:
heliacal (first and last visibility): arcus visionis = 10.50 + 1.40 x magnitude
acronychal rising, cosmical setting: arcus visionis = 8.90 + 1.10 x magnitude
Both the constant and coefficient of magnitude are adjustable to 0.01 and the resulting arcus visionis is also calculated to 0.01 (although this is surely false precision and 0.1 is a more reasonable limit). Because differences in azimuth between stars and the sun may differ greatly from differences for planets and the sun, particularly at higher geographical latitudes, a clear distinction of arcus visionis for heliacal and acronychal phenomena may be less applicable and it may be advisable to set the arcus visionis manually, taking into account the differences of azimuth. After making any changes, click OK and the new values are saved, but are not yet applied to any stars. If the new values are not to be saved, click Cancel. Whether the values are to be saved or used without saving, the calculation of the arcus visionis is as follows:
To calculate the arcus visionis from the formulas for a single star, select the star in the name list, and press calculate arcus visionis from magnitude (for selected star). The calculated heliacal and acronychal arcus visionis then appear in the in use column and are retained and used in the computation of visibility phenomena. To make these the default values for the selected star, press >>, and the in use values appear in the default column. To make the default values, if different, the in use values, press <<, and the default values appear in the in use column. The in use and default values may also be set manually without using the formulas or arrows. These changes are retained and used in computation whether OK or Cancel is pressed to close the window. Click OK and a calculation is run for the last object calculated, which may not be the star selected and set in the stellar visibility page. To calculate visibility phenomena for the star just set, it must be selected and run from the list of Stars.
To calculate the arcus visionis from the formulas for all stars, for example, if the formulas are changed, press calculate arcus visionis from magnitude (for all stars). The calculated heliacal and acronychal arcus visionis then appear in the in use column for all stars and will be retained and used in the computation of visibility phenomena. To make these the default values, it is necessary to make the changes individually using >> or manually; the reason is that in this way default values for individual stars may be retained while the in use values are varied. These changes are retained and used in computation whether OK or Cancel is pressed to close the window. Click OK and a calculation is run for the last object calculated, which may not be a star.
The critical altitude is adjustable from 0° to 20° at intervals of 0.01° (although here also 0.1° is more reasonable precision). The default value is 0°, crossing the horizon, but it is not likely that any star is visible at the horizon so some higher value, depending upon the magnitude of the star and local conditions, should be used. To set the critical altitude for a single star, select the star in the name list and enter the critical altitude in the in use column; this value is retained and used in the computation of visibility phenomena. The values may be shifted between the in use and default columns by pressing >> and << and may also be set manually. To set the same critical altitude for all stars, enter it next to set critical altitude (for all stars) and press that button; the value then appears in the in use column for all stars. As for the arcus visionis, the default values must be set individually using >> or manually; in this way the in use values may be varied and default values for individual stars retained. The critical altitude, for a single star or for all stars, is retained and used in computation whether OK or Cancel is pressed to close the window. Click OK and the value assigned to set critical altitude (for all stars) is saved and a calculation is run for the last object calculated, which may not be a star.
Finally, the set default values button performs the following functions:
- The formulas for calculate arcus visionis from magnitude are reset to the default values given above.
- The set critical altitude (for all stars) is reset to the last value saved.
- The in use values of the arcus visionis and critical altitude of every star are set to whatever is entered in each star's default column.
When a new star is added to the list of Stars, the in use and default values of the arcus visionis and critical altitude are automatically set using the formulas for arcus visionis and the critical altitude for all stars last saved in the stellar visibility page.
The heliacal/acronychal dates and more information windows and the command text/print are the same as for the superior planets.
The HTML files for rise, culmination, and set times of a star and the sun, and for the heliacal and acronychal phenomena of a star, are the same as for the superior planets.